Terminal and Terminator
It was long time ago when I realized that the major part of my work is being done in the Linux terminal. This is why I pay attention to things like shell and GNU tools, because knowing them well is often more than a half of job done.
Afterwards, I found out that having just one terminal window is not enough. Even though having many windows (represented by tabs in Linux terminal-handling tools or by many Putty instances) can solve this problem, it is often desired to keep things in sight at the same time. For example, we may want to execute some code or tests and at the same time watch over log files by using tail.
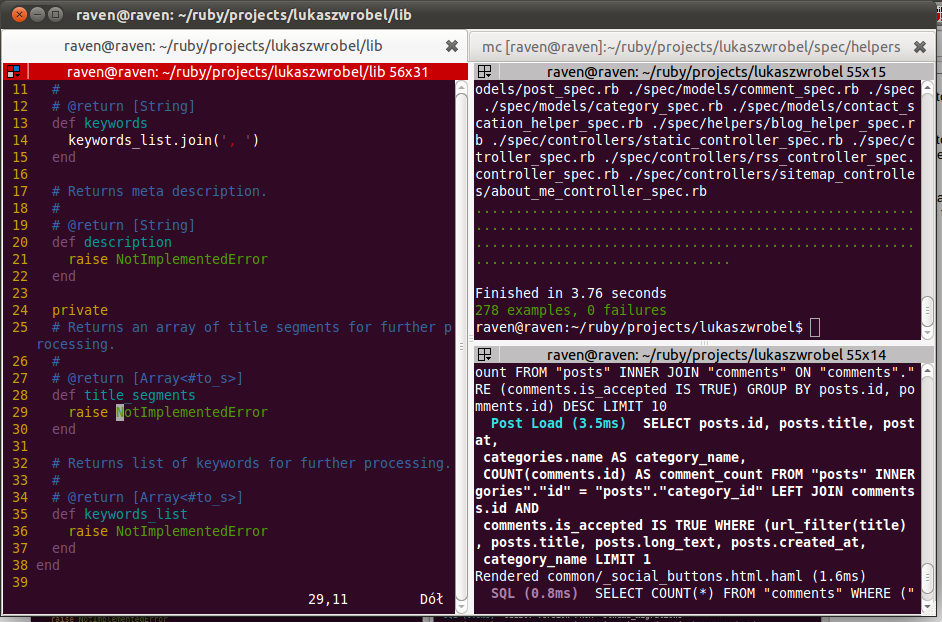
Terminator seemed to me the right tool to do the job. It’s easy to install and it does exactly what it’s supposed to do - it can split terminal windows both horizontally and vertically, according to user’s requirements. It also allows to keep multiple tabs opened in case splitting one window is not enough. Its important disadvantage is that Terminator is a GUI tool, so it won’t work if an X server is not at hand.
Terminator in action:

Of course, there is also the screen tool, but it has always been somehow mysterious to me. I was using it to run tasks in the background and to avoid problems caused by losing connection with remote machine. But I’ve never been brave enough to give screen the charge over my terminal windows and panes. I was pleased with Terminator, but then I found tmux.
Tmux lies somewhere between Terminator and screen, combining ease of use with basing on the plain terminal only. Here are the advantages of tmux over Terminator:
- Portability — tmux works on all systems able to handle plain, old terminal.
- Scriptability — tmux can be scripted, so that setting up windows and panes takes nothing more than one or two keystrokes.
- Server-client architecture — tmux can be used to share sessions between users.
- Tweaks and options — both tmux and Terminator are easy to get with, but it’s tmux that allows to go further and offers wide range of configuration hacks.
Beginning With tmux
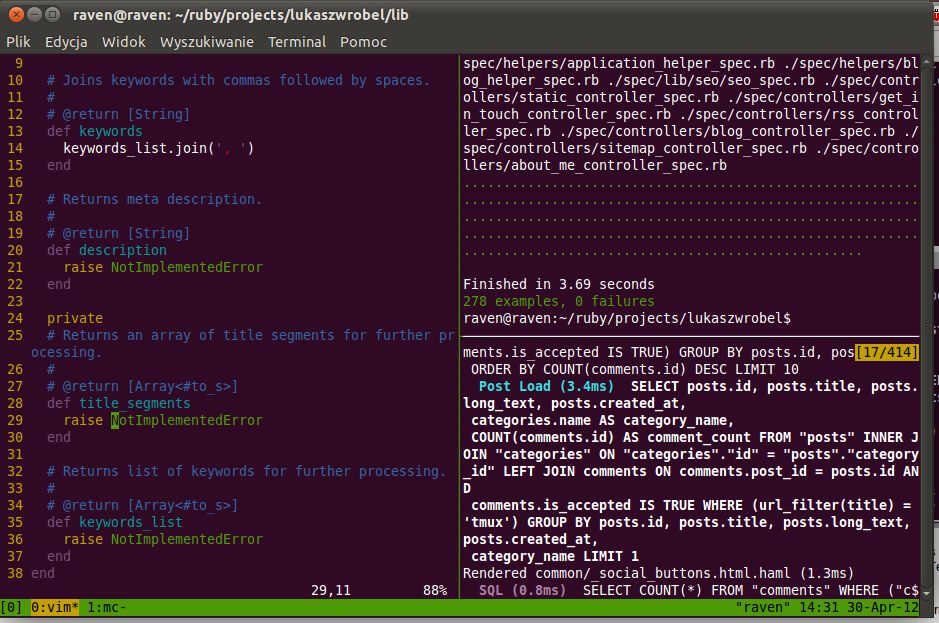
To start tmux, simply type tmux in your terminal and press Return. This is what a tmux session may look like:

By reading this section, you’ll get to know how to use tmux to split terminal window into panes and how to use multiple windows. This will let you do 90% of your work.
The first thing you should know is that Ctrl+b is the default prefix in tmux. It means that running any command requires typing in the prefix first. As you probably have guessed, this is to avoid conflicts with key combinations used in other programs run in the terminal.
Here is a list of a few basic tmux commands:
Ctrl+b "— split pane horizontally.Ctrl+b %— split pane vertically.Ctrl+b arrow key— switch pane.- Hold
Ctrl+b, don’t release it and hold one of the arrow keys — resize pane. Ctrl+b c— (c)reate a new window.Ctrl+b n— move to the (n)ext window.Ctrl+b p— move to the (p)revious window.
Other thing worth knowing is that scrolling is enabled by pressing Ctrl+b PgUp/PgDown. In fact, it enables the copy mode, which can also be done by pressing Ctrl+b [. When in copy mode, you can use PgUp/PgDown and arrow keys to scroll through the terminal contents. To (q)uit the copy mode, simply press the q key.
That should do the trick. At least, most of it.
Quitting tmux
To close a single pane in tmux, you need to either press Ctrl+d or type exit and press Return.
If you have multiple windows or panes opened and want to close them all at once, press the prefix (Ctrl+b), then type :kill-session and press Return.
Adjusting tmux
Your tmux configuration file should be named .tmux.conf and stored in your home directory. This is a regular text file and it’s the key to adjusting tmux.
Just remember that after every modification, tmux must be refreshed to take new settings into account. This can be achieved either by restarting it or by typing in:
tmux source-file .tmux.conf
Let’s start modifying .tmux.conf with a simple example.
Changing the Prefix
As we said before, tmux uses the prefix to distinguish between commands sent to tmux itself and programs running inside of it. As the default prefix (Ctrl+b) is pretty awkward, we’ll replace it with Ctrl+a, which is both easier to use (a is located closer to Ctrl than b) and time-honored, as the screen tool has been using it since a long time. To change the prefix, we need to open the .tmux.conf file and type in:
unbind C-b
set -g prefix C-a
These directives are pretty self-explanatory, I hope. First we release the default prefix and then we settle a new one. Nothing to add here.
Pane switching with Alt+arrow
For pane switching, Alt+arrow key combination (which is default in Terminator) worked fine for me and didn’t cause any conflicts so far, so I think it will work fine in tmux, too. But it is of course a matter of taste and you can use whatever key you want. To switch panes with Alt, you can use these directives:
bind -n M-Left select-pane -L
bind -n M-Right select-pane -R
bind -n M-Up select-pane -U
bind -n M-Down select-pane -D
Make sure that you don’t run tmux in the Terminator, as the latter will catch Alt+arrow combination and pane switching inside tmux won’t work.
Activity Monitoring
If you have many tmux windows opened, you might want to get notified when something happens inside other windows. Pasting this:
setw -g monitor-activity on
set -g visual-activity on
into the .tmux.conf file will cause tmux to write a message and highlight the window inside of which the activity took place (that is, something was written to the output).
Highlighting Current Window Using Specified Colour
Pasting the following:
set-window-option -g window-status-current-bg yellow
into the configuration file enables highlighting the current window using the yellow colour. You may also specify one of: “black”, “red”, “green”, “blue”, “magenta”, “cyan” and “white” or write “colour\d+“, e.g. “colour5” or “colour170”, which picks a color from the terminal’s palette.
Pane Switching Using Mouse
In order to make migration from Terminator a little bit easier, you can modify tmux configuration file to allow pane switching using your mouse:
set-option -g mouse-select-pane on
Of course, this may be considered as an undesirable behaviour, as the tmux allows to boost productivity by not requiring to touch the mouse at all.
.bashrc Problem
I don’t know how about you, but I like to keep a few tweaks in my rc file (.bashrc in case of bash shell). However, with tmux the .bashrc file isn’t read at all. After examining things a bit, I found out that tmux tries to read .bash_profile instead of .bashrc. I won’t mention rules standing behind it here as they are quite complicated, I will show you a simple workaround instead. Adding this line:
source ~/.bashrc
to .bash_profile solves the issue.
Advanced Capabilities of tmux
Scripting tmux
My favourite pane layout often looks the same every time I use tmux, of course it depends on the type of work being done. For example, working on a project may require a pane with source code, second for running tests and third one for tailing logs. Setting these panes up is a perfect example of a dull task. Then it’s not a surprise that in tmux it can be automated:
selectp -t 0 # select the first (0) pane
splitw -h -p 50 # split it into two halves

selectp -t 1 # select the new, second (1) pane
splitw -v -p 50 # split it into two halves
selectp -t 0 # go back to the first pane
These commands should be saved in a separate file, e.g. .tmux/dev. In order to be able to run it, you should point to it from the .tmux.conf file:
bind D source-file ~/.tmux/dev
From now on, pressing the prefix (Ctrl+b) followed by D (it’s an uppercase character in this example, so Shift is required) will execute commands located in the .tmux/dev file.
It’s also worth knowing that such file can do a little more than just opening the panes. It can also run commands inside them, for example:
splitw -h -p 50 'vim' # split current pane and run 'vim' command inside the new one
Building your own scripting files won’t take too much time and will pay off soon.
Session Sharing
All we’ve talked about so far is limited to a one-user session. As screen allows to share session, tmux is no worse. And setting things up is not too complicated.
In order to share session on the same machine, you have to explicitly give tmux the path to the Unix socket which will be used through the session lifetime:
tmux -S /tmp/our_socket
Then you have to give other users access to the newly created file:
chmod 777 /tmp/our_socket
As expected, when a new user wants to join the session, he has to pass the socket path, so that tmux knows which session is about to be used:
tmux -S /tmp/our_socket attach
Note that setting privileges to 777 is one of the dumbest things you can do, unless you fully trust your co-workers. You can also consider more sophisticated access control, SSH forwarding or give wemux a try. wemux is a set of scripts that makes sharing session easier and cleaner.
This way or another, sharing session with tmux is quite easy, though not always fully secure. It takes some time to do it right.
Summary
tmux is not a breakthrough, in fact I suppose it was never meant to be one. However, it’s a breath of fresh air that made using multiple terminals a little bit easier to me. Since I feel I’m more productive with tmux, I think I’ll stick to it.